Hello, everyone! The Teen Cooking Queen has officially moved!! It's been on my to-do list for nearly ages, and now, my new website is born. I even have a new name. So, hop right on over to www.inkateskitchen.com for scrumptious recipes and some more of my random food-related thoughts : ) Let the party begin!! (or continue?)
Tuesday, June 29, 2010
Sunday, June 13, 2010
Raspberry Granita
June 21 marks the beginning of summer and the weather here in Nebraska is starting to get pretty toasty. And when you sleep in until 10:00, you tend to miss the chillier parts of the day.
Luckily, little smarty-pants Oliver Evans designed the first refrigeration system in 1805. It was then built by Jacob Perkins in 1834. The first ice cream parlor in America opened even earlier in 1776 in New York. The date sound familiar? That's because it's the same year the Declaration of Independence was signed. It's a good thing ice cream didn't make it down to Pennsylvania by then. History could have been changed forever.
Now that we have today's mini history lesson out of the way, on to the granita!

A granita is kind of like a hybrid of a slushy and sorbet. It's a frozen dessert usually flavored with different fruits. In our case, raspberry will be the star of the show. Raspberries are easier to find during the summer, but you still need 2 cups for this recipe so you might want to go with frozen berries. Every year, we package fresh picked raspberries and freeze them. That's what I used, and, once they're thawed, they work perfectly.
Raspberry Granita
2 cups fresh or frozen raspberries
1 cup sugar
1 1/2 cup water
1 tbsp lemon juice
Heavy cream(optional. But, come on! Who doesn't want whipped cream?)
Put your raspberries in a fine mesh strainer or sieve set over a larger bowl. Using a spoon, push the berries through the strainer. Some of the seeds will probably go through the strainer, but they are hardly noticeable in the end result. Keep pressing the raspberries until you've squished the living daylights out of them. Then you're probably good! You should have about 1 cup of raspberry puree. Then, in a saucepan, put the water and sugar over medium heat. Stir for about 3 minutes until all the sugar is dissolved. At this point, you could wait for the sugar syrup to cool off, but I don't have that kind of patience so I just kept going. Measure out 1/2 cup of your raspberry puree and add it to the syrup along with the lemon juice. Pour the mixture into a 13x9 pan. Next, open the freezer door and attempt to clear a flat spot for the pan. This was especially difficult in our freezer. I had to really work around all the frozen pizza and unmarked veggies(who knows what they are?) Then carefully carry the pan to the freezer without spilling half of it over the side. You don't want to clean that sticky goo off the floor later. Let the granita hang out in the freezer for about 2 hours. After that, use the tines of a fork the scrape the pan into a slushy type thing. It won't be completely frozen yet, so put it back in the freezer for another 2 hours. Repeat the scraping process so it looks like this.

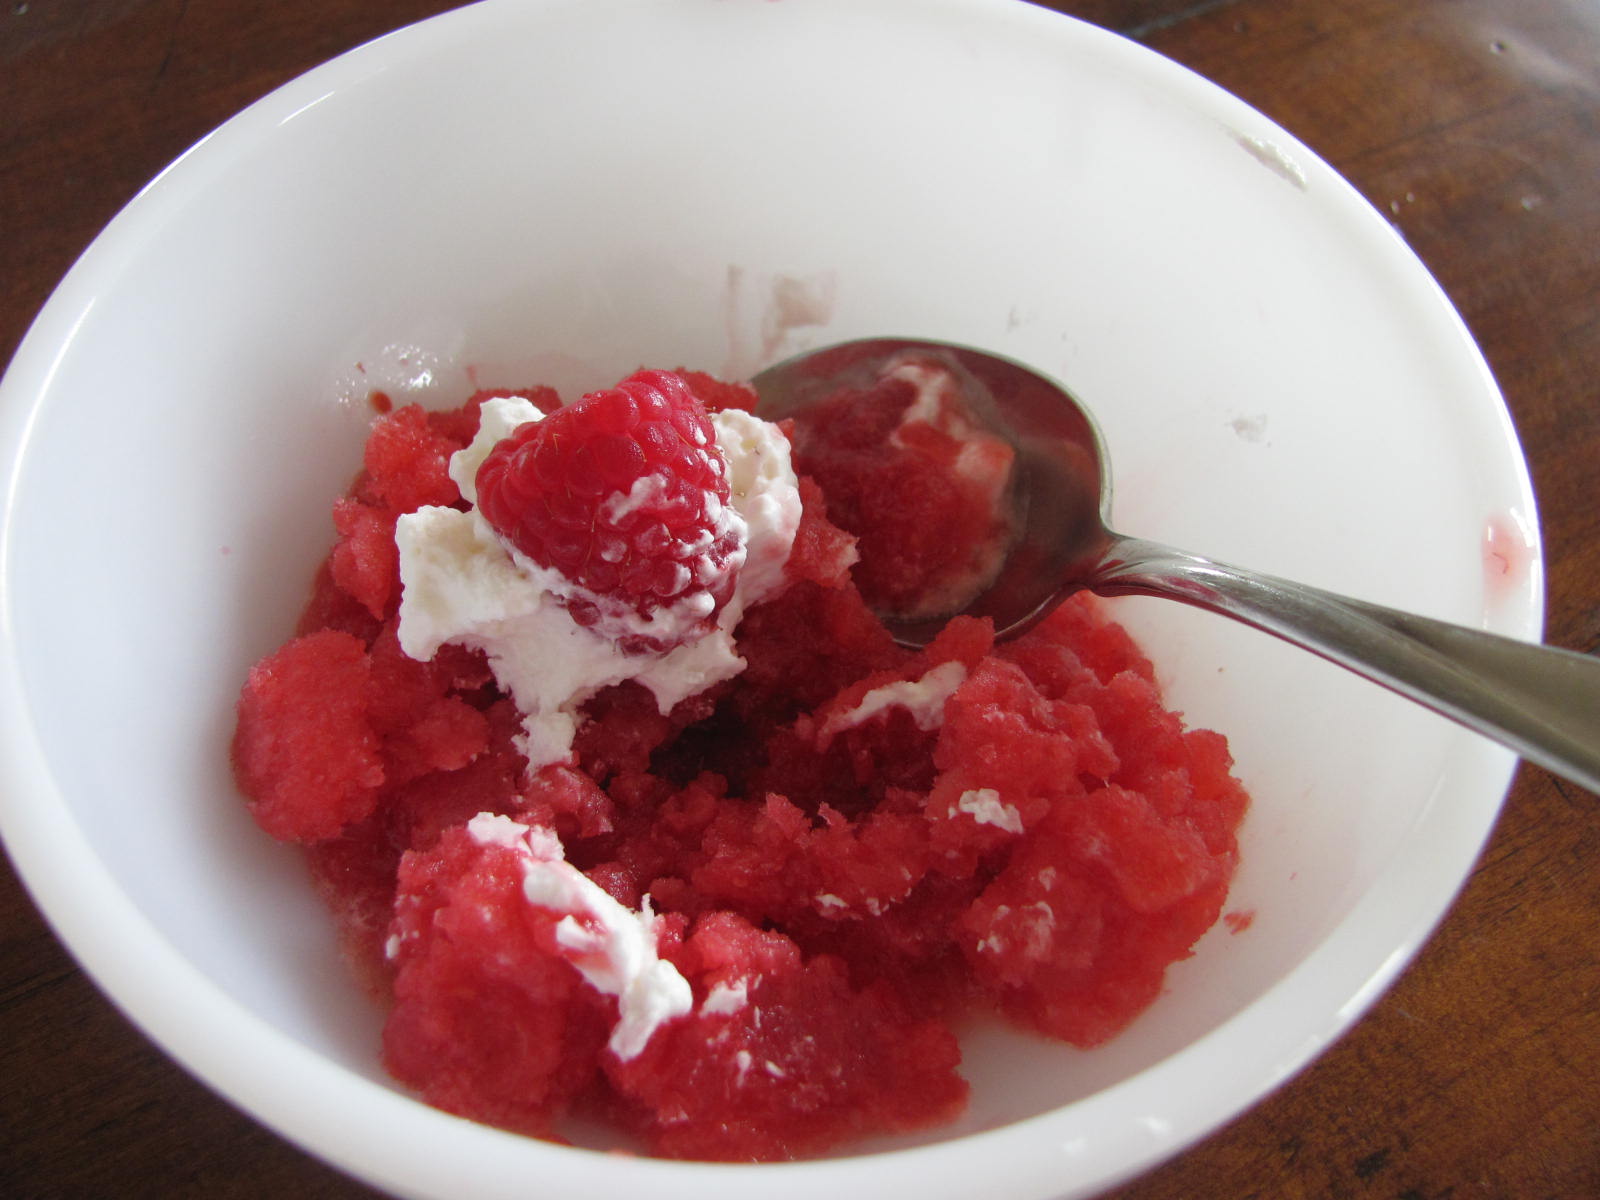
Yum! You can serve it now if you want to. A little whipped cream is delightful. I always whip the cream with a tablespoon of powdered sugar on high until it's nice and stiff.

With a single fresh berry for garnish. Look. Taste. Sigh. : )

If you don't want to eat it right away, you can always stick it back in the freezer.

Just make sure you do the fork scrape thing before serving it each time.

And you will want to hurry up and eat it. You know, so it doesn't melt and everything.

This is a fabulous treat for summer. So refreshing and light.

And simple! Just perfect...

Happy summer solstice!
Luckily, little smarty-pants Oliver Evans designed the first refrigeration system in 1805. It was then built by Jacob Perkins in 1834. The first ice cream parlor in America opened even earlier in 1776 in New York. The date sound familiar? That's because it's the same year the Declaration of Independence was signed. It's a good thing ice cream didn't make it down to Pennsylvania by then. History could have been changed forever.
Now that we have today's mini history lesson out of the way, on to the granita!

A granita is kind of like a hybrid of a slushy and sorbet. It's a frozen dessert usually flavored with different fruits. In our case, raspberry will be the star of the show. Raspberries are easier to find during the summer, but you still need 2 cups for this recipe so you might want to go with frozen berries. Every year, we package fresh picked raspberries and freeze them. That's what I used, and, once they're thawed, they work perfectly.
Raspberry Granita
2 cups fresh or frozen raspberries
1 cup sugar
1 1/2 cup water
1 tbsp lemon juice
Heavy cream(optional. But, come on! Who doesn't want whipped cream?)
Put your raspberries in a fine mesh strainer or sieve set over a larger bowl. Using a spoon, push the berries through the strainer. Some of the seeds will probably go through the strainer, but they are hardly noticeable in the end result. Keep pressing the raspberries until you've squished the living daylights out of them. Then you're probably good! You should have about 1 cup of raspberry puree. Then, in a saucepan, put the water and sugar over medium heat. Stir for about 3 minutes until all the sugar is dissolved. At this point, you could wait for the sugar syrup to cool off, but I don't have that kind of patience so I just kept going. Measure out 1/2 cup of your raspberry puree and add it to the syrup along with the lemon juice. Pour the mixture into a 13x9 pan. Next, open the freezer door and attempt to clear a flat spot for the pan. This was especially difficult in our freezer. I had to really work around all the frozen pizza and unmarked veggies(who knows what they are?) Then carefully carry the pan to the freezer without spilling half of it over the side. You don't want to clean that sticky goo off the floor later. Let the granita hang out in the freezer for about 2 hours. After that, use the tines of a fork the scrape the pan into a slushy type thing. It won't be completely frozen yet, so put it back in the freezer for another 2 hours. Repeat the scraping process so it looks like this.

Yum! You can serve it now if you want to. A little whipped cream is delightful. I always whip the cream with a tablespoon of powdered sugar on high until it's nice and stiff.

With a single fresh berry for garnish. Look. Taste. Sigh. : )

If you don't want to eat it right away, you can always stick it back in the freezer.
Just make sure you do the fork scrape thing before serving it each time.

And you will want to hurry up and eat it. You know, so it doesn't melt and everything.

This is a fabulous treat for summer. So refreshing and light.

And simple! Just perfect...

Happy summer solstice!
Sunday, June 6, 2010
We Have Been Nominated!
Hello everyone! I'm ecstatic that it is now Summer and I have until August 13(when we must return to the chamber, I mean school) to cook, bake, and blog!! When I was recently checking up on this website, I noticed a comment on the last post. Apparently, the Teen Cooking Queen has earned a Sunshine Award! Now, I had never heard of it and wasn't sure what it was but I think I get it now. It's pretty much an award that bloggers give to fellow bloggers. When you receive the award, you are required to do a few things:
1. Nominate 12(or less?) other blogs for the reward.
2. Put the award logo on your blog or withing a post.
3. Link to your nominees within the post.
4. Let your nominees know they received the award by commenting on their blog.
5. Link to the person who you received the award from.
We were nominated by Island Vittles, who has some delicious looking recipes over on her site. Thanks so much, Island Vittles!
So here are a couple of fabulous blogs that I nominate for the Sunshine award:
Rainy Day Gal
17 and Baking
Bakerella
Tuesday, May 25, 2010
Pancake cooking
Good morning! Today, the 24th, I did a demonstration speech in communications and thought I would fill you in on what happened. My partner, who happened to be a guy, wanted to make pancakes for the demonstration so I thought, "what the heck?", so I let him use his recipe. His part of the speech went great and then I attempted cooking the pancakes in front of my entire class. uh oh... The first pancake started smoking because the pan was too hot. The batter was well cooked, in fact, charred. After that one was done I tried to make another pancake but this one I flipped too early and the pancake "exploded" and batter went everywhere. I dropped the whisk on the kitchen floor in the FCS room and couldn't get the chocolate chip bag open. My partner's recipe was delicious and I have to give him credit, I didn't think he would full fill his part. oh well. I ruined a perfect pancake. I guess my cooking of pancakes is over, I don't want to murder anymore. I felt like an idiot after that presentation but the 25th, today, was our last day so I won't have to face anyone else on how dorky I looked. I still received an A on the project so everything is okay. My teacher also has a great sense of humor so I think that helped my grade. Has anyone else had these types of issues with cooking pancakes or is it just me and my lovely talents with hand and eye coordination?
-H
Saturday, April 17, 2010
Happy Birthday Blog!
The month of April marks 1 year of the Teen Cooking Queen blog!! That's 1 year, 12 months, 52 weeks, or 365 days of cooking, pictures, and posting. This is post number 43. By next year, I'm hoping to make it to 100 posts. Another reason to celebrate!
But, to celebrate the first birthday of the blog, there were cookies. And plenty of them. It was a cookie party!

That's just the beginning of our cookie-making. The menu included homemade peanut butter cookies and M&M(due to lack of chocolate chips) cookies. Both turned out marvelously.

And we ended up with a plate of soft, chewy cookies. And plenty of cookie dough that we gleefully feasted on.

Ahh, someone's hand reaching in for a circle of sweetness(most definitely not mine!) I really don't blame them. Go for the peanut butter one! Good choice.
BUT, that is not where the celebration festivities ended! Oh, no. Today, I was bored. As usual. AND, we just happened to have(momentarily clear throat) 8 pounds of strawberries in the fridge. My mom used almost half to make jam last night but there was still too many to eat. Or were there?
 Yep, two of these babies occupied the entire leftover shelf of the fridge. It was insanity! Luckily, I remembered seeing the cutest little recipe for Mini Strawberry Pies on the Tasty Kitchen from rainydaygal. She also has a super cute blog, here! I had never made or eaten a strawberry pie in all of my existence but figured, why not? And got to work clearing out our strawberry stash!
 First you have to cut in half(or fourths for the larger ones) 4 cups of strawberries.

Then mix them with 1 tablespoon vanilla extract and dump in a dry ingredient mixture of flour, sugar, brown sugar, cornstarch, cinnamon, and nutmeg.
While the strawberries are marinating in their sugary coating, I prepared the crust. The recipe includes directions on how to make homemade crust, but I just used some premade crust that we had in the fridge and it worked fine. It also says to cut out 3 inch circles but I had to use a cutter slightly larger to make it fit. Stuff the circles into 9 cups of a muffin pan and fill with the berries.

Now this is where it gets fun! I used our new little pastry wheel(a pizza cutter also does the job) to cut strips of the dough and lay them across the mini pies in two directions to give a lattice top appearance. Pop them in the oven for half an hour and make yourself a snack! Cheese is always my pick.
 When they come out of the oven their little tops are golden and crispy and the aroma will make anyone fall in love with them. I definitely did!
 I attempted to put artsy strawberries on the top like in rainydaygal's recipe but it just didn't have the same affect.

Buy, anyway, happy birthday blog! I am excited for another year of (hopefully) delicious blogging!!

But, to celebrate the first birthday of the blog, there were cookies. And plenty of them. It was a cookie party!

That's just the beginning of our cookie-making. The menu included homemade peanut butter cookies and M&M(due to lack of chocolate chips) cookies. Both turned out marvelously.

And we ended up with a plate of soft, chewy cookies. And plenty of cookie dough that we gleefully feasted on.

Ahh, someone's hand reaching in for a circle of sweetness(most definitely not mine!) I really don't blame them. Go for the peanut butter one! Good choice.
BUT, that is not where the celebration festivities ended! Oh, no. Today, I was bored. As usual. AND, we just happened to have(momentarily clear throat) 8 pounds of strawberries in the fridge. My mom used almost half to make jam last night but there was still too many to eat. Or were there?
 Yep, two of these babies occupied the entire leftover shelf of the fridge. It was insanity! Luckily, I remembered seeing the cutest little recipe for Mini Strawberry Pies on the Tasty Kitchen from rainydaygal. She also has a super cute blog, here! I had never made or eaten a strawberry pie in all of my existence but figured, why not? And got to work clearing out our strawberry stash!
 First you have to cut in half(or fourths for the larger ones) 4 cups of strawberries.
Then mix them with 1 tablespoon vanilla extract and dump in a dry ingredient mixture of flour, sugar, brown sugar, cornstarch, cinnamon, and nutmeg.
While the strawberries are marinating in their sugary coating, I prepared the crust. The recipe includes directions on how to make homemade crust, but I just used some premade crust that we had in the fridge and it worked fine. It also says to cut out 3 inch circles but I had to use a cutter slightly larger to make it fit. Stuff the circles into 9 cups of a muffin pan and fill with the berries.

Now this is where it gets fun! I used our new little pastry wheel(a pizza cutter also does the job) to cut strips of the dough and lay them across the mini pies in two directions to give a lattice top appearance. Pop them in the oven for half an hour and make yourself a snack! Cheese is always my pick.
 When they come out of the oven their little tops are golden and crispy and the aroma will make anyone fall in love with them. I definitely did!
 I attempted to put artsy strawberries on the top like in rainydaygal's recipe but it just didn't have the same affect.
Buy, anyway, happy birthday blog! I am excited for another year of (hopefully) delicious blogging!!
Monday, March 29, 2010
Think Inside the Box
I'm just saying it right now, I promise I won't totally nag on boxed muffin mix. I actually adore you, Betty Crocker. You provide the easily prepared sweets for my, at times, hectic life. What would the world be like without Betty Crocker and Pillsbury boxed mixes, you ask? Well, everyone would know how to make homemade brownies! Or we would manage to live without. But let's not think about those scary thoughts.
Betty Crocker, you're a magnificent lady!
Anywho, just in case you don't know, I absolutely loathe Twinkies, pre-made pie filling, and other plastic(I mean cream) filled cake things. But boxed muffin mix is fine with me!
Sometimes you get the little fake blueberry pellets that just appear quite unappetizing. But we were lucky enough to stumble across this beauty:

Wild Blueberry boxed muffin mix...with a can of real blueberries!! I was ecstatic. So I got to work right away(ok, maybe a couple days after the purchase of the muffin mix)

Contents of box: 1 pouch of mix, 1 can of little baby blueberries.
 So, then you can strain, rinse(the berries), and mix!

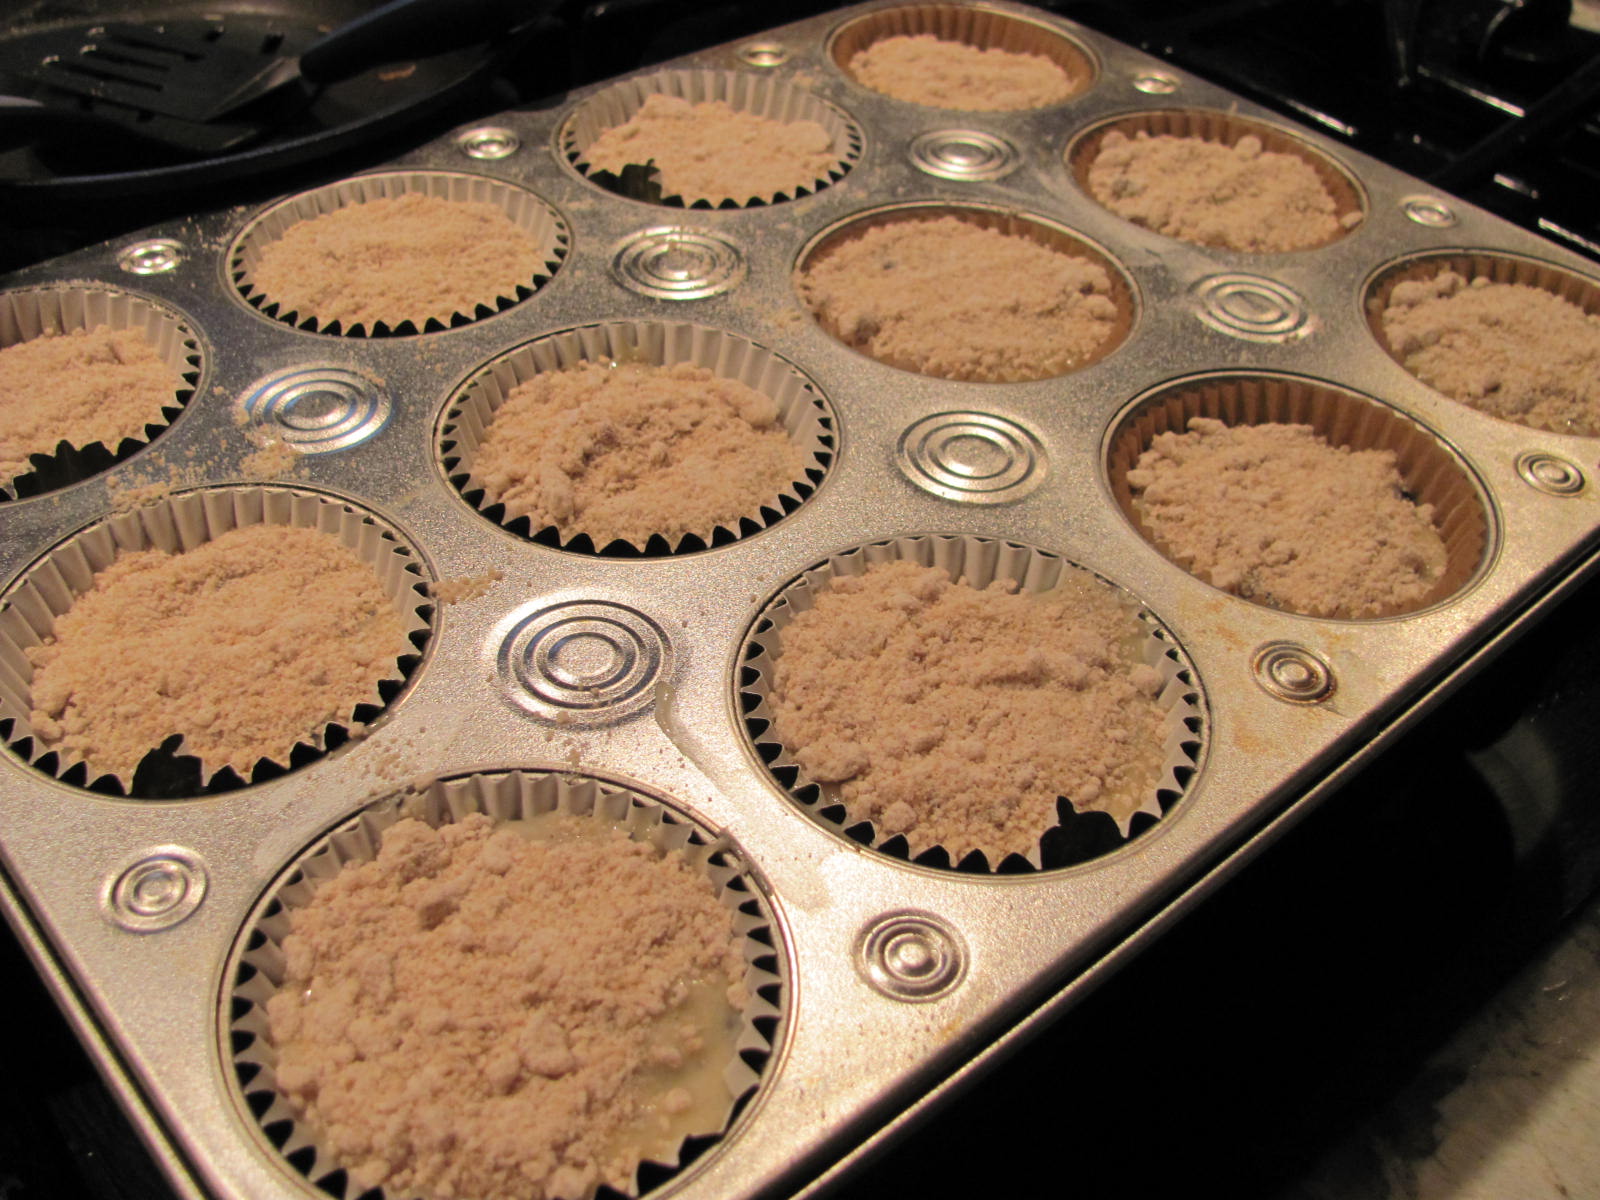
Then fill a 12-cup muffin pan with paper muffin liners. I started out using my 100% eco-friendly, recycled, and unbleached muffin cups. Then I ran out and was stuck between gold cups and Christmas tree ones. I was most definitely between a rock and an extremely hard place.

But I finally settled on the gold ones. Fill all the cups to, you know, 2/3 or 3/4 full. It can even be 4/5 if you really want.

I found some leftover streusel in the fridge and threw that on top for crumbly deliciousness!
 Pop them in the oven for the recommended time. Look at those golden, crispy tops only to reveal the moist and flavorful insides.

There's tomorrow's breakfast in under 30 minutes!! And to think it all came from a box : )
Betty Crocker, you're a magnificent lady!
Anywho, just in case you don't know, I absolutely loathe Twinkies, pre-made pie filling, and other plastic(I mean cream) filled cake things. But boxed muffin mix is fine with me!
Sometimes you get the little fake blueberry pellets that just appear quite unappetizing. But we were lucky enough to stumble across this beauty:

Wild Blueberry boxed muffin mix...with a can of real blueberries!! I was ecstatic. So I got to work right away(ok, maybe a couple days after the purchase of the muffin mix)

Contents of box: 1 pouch of mix, 1 can of little baby blueberries.
 So, then you can strain, rinse(the berries), and mix!
Then fill a 12-cup muffin pan with paper muffin liners. I started out using my 100% eco-friendly, recycled, and unbleached muffin cups. Then I ran out and was stuck between gold cups and Christmas tree ones. I was most definitely between a rock and an extremely hard place.

But I finally settled on the gold ones. Fill all the cups to, you know, 2/3 or 3/4 full. It can even be 4/5 if you really want.
I found some leftover streusel in the fridge and threw that on top for crumbly deliciousness!
 Pop them in the oven for the recommended time. Look at those golden, crispy tops only to reveal the moist and flavorful insides.
There's tomorrow's breakfast in under 30 minutes!! And to think it all came from a box : )
Saturday, March 20, 2010
Cookie Dough Truffles

Yes, I'm still here. I know it's been a while since I blogged but really I've just been building up delicious recipes and preparing you for the whirlwind of yummy food.
These cookie dough truffles came about two months ago when I was just bored on a Saturday afternoon and needed something to bake. I was perusing the Tasty Kitchen website when I came across a recipe for Chocolate Chip Cookie Dough Truffles submitted by Loveandoliveoil. "Cookie dough truffles?", I proclaimed. "They make little balls of cookie dough and dip them in chocolate?!" I was astounded and had to whip them up. (HINT: all the little underlined words are links:)
Now, I will warn you, they are most definitely not a 15-minute dessert and do take a little extra time, but they are so worth it. By the time I got to the chocolate dipping stage, I realized we were limited on chocolate chips to melt. So, a couple of truffles got completely dipped but for the others, I put the chocolate in a candy making squeeze bottle thingy and drizzled chocolate over them. The naked truffles ended up just as good.
I had made these the night I had friends over and they mysteriously ended up gone at about 2 in the morning. Of course, no one got enough so I made them again just a couple weeks ago and gave them out at school in little baggies to my friends. Everyone is always very appreciative and happy for the 10 minutes that they last!
NOTE: This cookie dough is egg-free. No, I'm not trying to give everyone salmonella.
Here is the recipe! Enjoy!! (and make them today!)
Chocolate Chip Cookie Dough Truffles
2 1/2 cups flour
1 1/2 tsp baking soda
1 tsp salt
1 cup butter or margarine-soft
3/4 cup sugar
3/4 brown sugar
1 tsp vanilla
1/2 cup milk
1 cup mini semi-sweet chocolate chips
14 oz. chocolate candy coating(this is what the original recipe calls for. I just melted chocolate chips. You can probably eyeball about how many you need.)
Beat the butter and sugars on medium speed until fluffy and light. Add in the milk and vanilla and mix. Then, mix in the flour, baking soda, and salt. Stir in the chocolate chips.
Cover and chill the dough for about an hour so it is easier to handle.
Once the dough is done chilling, take it out and form into small balls. I used a little scooper so they were all about the same size. Mine were relatively small but I wouldn't have wanted them much bigger. Beware; this recipe does make quite a few truffles.
Place the cookie dough balls on a a wax paper-lined cookie sheet and chill again for about 30 minutes.
Take the dough out and melt the chocolate. I would recommend melting in a double boiler(putting a bowl with the chocolate over a simmering pot of water) but you could also use the microwave. Use two forks to dip in the truffles, take them out, and place back on the wax paper.

Once they are all done, put them back in the fridge for a final chilling. Then eat them!!!

Subscribe to:
Posts (Atom)

